Quick Links
Synology offers a very user friendly Network Attached Storage (NAS) device experience, but that doesn't mean unboxing it and starting it up is exactly a one-click affair. Let's get things up and running so we can move onto all the fun projects a compact NAS with server-like functionality can facilitate.
What Is a Synology NAS?
Synology is a company, founded in 2000, specializing in Network Attached Storage (NAS) devices. A NAS, simply put, is a computer optimized for data storage, often with additional functionality layered on top. Synology has two primary product lines, DiskStation and RackStation, with the former intended for home users and small offices and the latter intended for larger commercial environments.
The DiskStation models range in size from simple one-bay models (starting at around $150) that offer a non-redundant place to park your data, all the way up to larger models that support 12 drives (starting at around $1000+) with support for advanced multi-disk redundancy and even expansion via auxillary disk bays. Between the two ends of the size spectrum, they can effectively cover the home use needs of everyone from the "I need to backup my family photos" crowd to the "I need to back up the entire internet" crowd.
DiskStation models come with a propriety Linux-derived operating system, known as DiskStation Manager. DiskStation Manager comes with a very intuitive web-based interface that feels like you're using a desktop computer, complete with easy to identify icons, well laid out menus, and abundant help files. In addition to core NAS features like file management, you can add a large array of custom plugins that handle things like organizing your family photos, torrenting files, and everything in between. The end result is a multi-function device that can perform the tasks of a full size computer, but without the energy consumption. (Even the beefiest DiskStation models consume less than half what a desktop computer or full size home server would.)
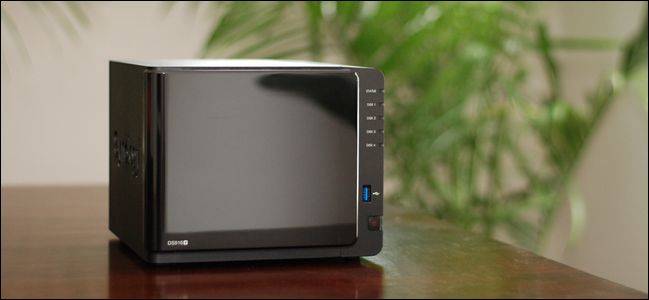
Let's look at the setup process for the Synology DS916+, a four-bay model with plenty storage room and plenty of memory and processing power (including on-the-fly video transcoding for home streaming applications). It's a great model to showcase the setup process, as it sports the additional ports and such found on the larger models but still shares the same operating system found on all DiskStation models.
The Physical Setup: Fill, Plug In, Boot, and Enjoy the Silence
Your Synology NAS comes with a power cable, an Ethernet cable, drive mounting screws, and, if you have a higher end model, it may also come with hot-swap drive bay trays, and a second Ethernet cable (the high end DiskStations support dual network cards for increased network throughput). Before we take a look at the actual unit and how to fill it up, let's talk about disk selection.
Hard Drive Selection
For an optimum NAS experience, we recommend starting with new drives, in the largest size your budget will allow. For our purposes we'll be using 8TB Western Digital Red drives, which are specifically designed for NAS use where operation is projected to be around the clock in a tight space. Regardless of the brand of hard drives you go with, you want to, at minimum, avoid budget or desktop drives and stick with server/NAS drives.
If you're contemplating what size drives to use (or the effects of mixing different size drives), we highly recommend Synology's easy to use drag-and-drop RAID calculator to help visualize how different drive combinations yield different amounts of usable space.

Synology uses a custom RAID setup called Synology Hybrid RAID (SHR)---seen as the selected option in the screenshot above---designed to keep your drives redundant. That means you'll need more drives, but if one fails, you won't lose any data, because it'll be mirrored on another drive. You can read more about RAID here, if you aren't familiar with it.
Even if you're familiar with basic RAID terminology, though, you're likely not familiar with Synolgy's Hybrid RAID setup if you haven't used Synology products before. It is a superior option for almost every consumer scenario, hands down. It offers more flexibility than traditional RAID, it's much easier to expand your storage in the future if you use it, and it makes radically more efficient use of disk space when the disk array doesn't have perfectly matched drives. Don't take our word for it though---if you want to dive into the technical breakdown between SHR and RAID, you can read up on it here.
Adding the Drives
Let's take a look at the case with the removable cover off, and then pop (and populate) the drive bays. To remove the face plate, simply wiggle it away from the chassis of the NAS. The plate is held in place by thick rubber fingers (designed to help silence vibration) and should come off easily with a first touch.

Note the tabs at the top of each drive bay. Simply push the tab gentle upwards and slide the tray out. Although tray screws are included with all the models (some of the more economical models in the Synology line don't have drive trays and require direct mounting of drives via screws), you don't need to use them on the hot-swap trays. While you can do so if you're really set in your ways, it's much better to use the hard drives in their trays without the screws by gently pulling off the side guards (seen below), pushing the hard drive into the tray, and then snapping the side guards back into place. (The only exception for the use of screws on the hot-swap trays is with the use of 2.5" drives---you have to screw mount them to keep them from sliding around.)

The hard drives are held very firmly in place thanks to rubber grommets in the side of the trays, and the lack of hard contact between the drive and the tray (thanks to the rubber buffer) does an amazing job minimizing vibration. Once you've trayed all your drives, slide them back into the NAS.
Where to Park Your NAS
With the drives in your NAS, it's time to take a peek at the back of the NAS to see where everything will be plugged in, and talk briefly about where you'll place it in your home. First, here's the backside.

On this particular model you'll find a power jack, two LAN ports, an eSATA port, two USB ports (which can be used both for storage expansion and backup as well as using your Synology as a print server), and, of course, the cooling fans. Why two LAN ports on the larger premium models? If you're using those models in a high-demand environment (e.g. your Synology is the file server for a large household or organization that is accessing the NAS simultaneously) you can use both LAN connections for a significant throughput boost. This kind of arrangement shines when multiple people are all streaming HD video at once but is less important if you're the only one streaming video to a single destination.
With that in mind let's talk about NAS placement. Wherever you place the NAS it should be, ideally, a cooler area of your home (ground floor and basements are great, stuffy attic guestrooms are not) with hardline access to your router or network switch. If you're a mostly-wireless household, this means you may be limited to placing your NAS next to wherever the router is installed.
First Boot Setup: Configuring Your NAS
Once you've found the right spot for your NAS and wired it all up, it's time to boot it up for the first time. Unlike a traditional computer, there won't be a mouse, keyboard, and monitor attached. When you press the power button, it will boot up quickly and then just sit there (don't be alarmed if you don't hear a thing, we can't hear the fans on our unit unless we have our ear a few inches from the back of it).
After powering it on, head to any computer that's on your local network (Ethernet or Wi-Fi connection is fine, so long as it's on the same network as the NAS). Open your web browser and head to http://find.synology.com, this will pull up the Web Assistant startup wizard, seen below. Click "Connect" to start the process of configuring your Synology NAS.

The first step is the naming of your server and the creation of the administration account. There's a couple things to consider on this step. FIrst, your server name is how your NAS will appear on your network and will be listed in various applications. A compact name that is easy to type out like, say, "blackbox" or "diskstation" is preferable to longer names with spaces like "Miltons Magic Download Fun Time Box".
Your username and password can be anything you want, but here's a pro tip for Windows users: if you make the username and password for the administration account of your NAS the same the username and password of your Windows PC, then you'll be able to seamlessly access all the network shares on the NAS from your Windows PC without entering a password or username.

In the next step, you can create a Synology account and a Quick Connect ID. This step is not required, however, if you plan on accessing your Synology NAS outside your network for any purpose (and there are a variety of reasons you may wish to do so like accessing your files while away from home, backing up vacation photos, or sharing files with friends) this is a handy way to skip fiddling with configuration settings later. QuickConnect is Synology's free included-with-your-NAS Dynamic DNS service that allows you to always dial home to your NAS with an easy to remember addresses like http://quickconnect.to/yourNASname instead of your home IP address.

After setting up (or skipping) the Quick Connect step, you'll be prompted to install some core application packages. You can also skip this step and pick them one by one later, but given the utility of the core packages, we suggest installing them all (they take up a trivial amount of space when installed).

Once you install (or skip), you're done with the basic setup process and the wizard will close.
Getting Around DiskStation Manager: The Basics
After this last step, you'll be prompted to take a very brief tour of the DiskStation Manager interface. Let's look at a few of those key areas now. Here's what the "desktop" of the DiskStation Manager looks like. There's access to applications with a shortcut and menu system, notifications in the upper right corner, and a system health and resource monitor in the lower right corner.

On the left hand side, you have a main menu and desktop shortcuts. The Start Menu-like button at the top of the screen will pull up all your apps, but there's direct access to four frequently used apps right on the desktop: Package Center, Control Panel, File Station, and DSM Help, as seen below.

The Package Center is where you can install, update, and remove applications. If you see notifications from the Package Center, this indicates that one or more of your installed applications needs updating.

The File Station is file manager that allows you to easily create and browse folders on your NAS with support for file manipulation (like cut, paste, move, and delete) built right into the right-click context menu.

The Control Panel is similar to the control panel on other operating systems, and includes settings for everything from the network configuration to usergroup management. The Control Panel is a great last stop for a setup tutorial, as it allows us to show you how to update the operating system of your NAS before sending you off to play around with it. Once you've opened the Control Panel by clicking on it, click on the "Update & Restore" icon in the "System" section.

Here you'll find any available core updates. Click "Download" to grab the update and then once it has downloaded click "Install".

Your NAS will reboot and you'll be running the most up-to-the-minute version of DiskStation Manager.
What Now?
At this point, you've got your new Synology NAS up and running. You may be asking yourself "But what about disk configuration? Formatting? Network shares? Why aren't we setting that up?" Well, we aren't setting it up because DiskStation Manager set it up automatically in the background for you. Based on the number of disks you insert during the initial setup, the NAS automatically selects the optimum configuration for those disk to maximize your storage potential (while still retaining redundancy with RAID). You can go into the settings menu and mess around with the configuration to allocate the disks differently, but unless you have a strong need to do so, we'd encourage you to stick with the space/redundancy optimized default.
In addition, there are already network shares set up with the administrator account of your NAS as the default user. Further, if you installed the application packages, there are default directories for many of those packages already in place. You can browse these directories either in the File Station app seen in the previous section of the tutorial, or just by pointing the file explorer on your PC to the name of the network share. We named our Synology NAS "blackbox" so it's accessible at \\blackbox\ in Windows, as seen below.

With this basic setup out of the way you're ready to use you're ready to start exploring the installed packages (and the available packages) in the Package Center, as well as filling up your available storage with all that's fit to back up.